Welcome to the triumphant return of OG Go Stay Work Play Live! And by that I mean you’re about to read a normal post about a bloggy location here in the UK. There are now more than a decade of such posts, so Astute Go Stay Work Play Live Readers are very familiar with this classic formula:
1. Take the train a modest distance on a sunny weekend morning, while doing the crossword.
2. Visit a diverting museum, gallery, castle, ancient ruin, park, village, trail, hill, barrow, stately home, bunker, etc. (Bonus for anything with Victorian machinery and exposed gears, most especially if powered by a steam engine that is actually running).
3. Take a lot of pictures and make notes while formulating bon mots in head for the blog.
4. Have coffee and cake in the tea room, preferably operated by smiling volunteers who are very friendly, if slightly harried, and maybe not entirely sure how the contactless payment thingy works. (Bonus if they have home-made flapjacks)
5. Poke around the gift shop. (Purchase optional.)
6. Go home and blog.
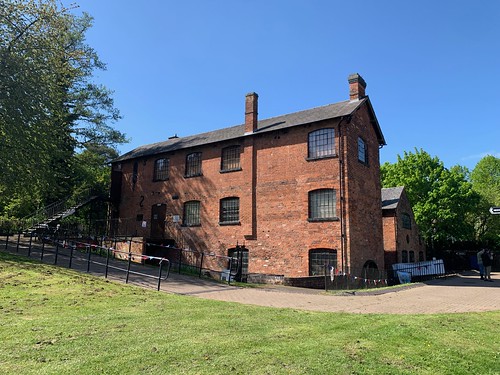
GSWPL is now coming to you from a temporary posting in Birmingham, working on the Opening and Closing Ceremonies of the Commonwealth Games (starting on July 28 for those who want to mark their calendars). In the Venn Diagram of my current schedule the overlapping area that includes both the Living-in-Birmingham circle and the Not-Too-Busy-To-Do-Bloggy-Things circle is exceedingly small. There are just three two-day weekends before we start rehearsals and the six-day work week starts. So on my first weekend in Brum I decided to check out a museum that Piran rated very very highly, despite its outwardly dry sounding name: the Forge Mill Needle Museum.
Located in Redditch, about half an hour from the central station in Birmingham, the Forge Mill Needle Museum is dedicated to the history and practice of needle manufacturing, commemorating a time when Redditch made 90% of the world’s needles. (Just in case you were thinking that it might not be what it sounds like. Oh no. It is EXACTLY what it sounds like.)
I did try to get someone to come with me for this adventure. But Piran is now based in the far south and I'm now in the middle north, so I turned to my friend Tom, who's an Aussie interloper also working on the Commonwealth Ceremonies. (We colonials need to stick together.) Sadly, Tom did not immediately leap at the opportunity to join me, even when he found out that it wasn't just ANY weekend at Forge Mill
So I set off on the train alone, which left more time for the crossword puzzle anyway (see above). It was a pleasant walk from the station to Forge Mill, and the evidence of 1940s weekend was apparent, with some jolly bunting up and a few folks wandering about in period dress. (Aside: I've done a lot of ceremonies now, and disappointingly small number of them have made use of a festive string on bunting here or there, which I think is a damned shame. It really cheers a place up.)

One of the things that excited me most was that the Forge Mill website promised "Much of the original Victorian water powered machinery remains and is working on Tuesday afternoons and weekends (March to October)" (Once again see above, including much-beloved working machinery!). Sadly, the waterwheel at Forge Mill is currently utterly immobile and covered by a tarp (despite the fact that it was a weekend between March and October) so I couldn't even get a nice photo. Major disappointment, and one which I may take up with the management at a later date, though in the moment I soldiered on.
The museum is set up to take you through the whole process of needle making, which you are now going to hear about in excruciating detail. Because that's how we roll here at GSWPL. The signage in the museum claimed that there were 30 different processes involved, though I struggled to define precisely all 30. Nonetheless it was certainly painstaking, starting with a heavy coil of thick steel wire, which requires the first step: drawing. The heavy wire is drawn through a series of increasing smaller dies to bring its diameter down to that of whatever size needle is being made. Originally this was done by hand by winding the wire on a large drum turned by a handle to give some mechanical advantage.
Step 2 is to cut the wire to the length of two needles, because when making needles you do them two at a time for the first bits, so you can stamp and cut the eyes for two needles from one die, saving time. Step 3 - rubbing - straightens out the lengths of wire, which retain a bit of curve from having been drawn and coiled.
Rubbing is done by packing hundreds wires into the centre of rubbing ring - two flat iron donuts (not one of Tim Horton's more popular varieties) connected together at the bottom but left open at the top. Once packed with wires, the whole double donut is placed upright so it can roll left and right. Along the open top, the Rubber sets a long flat piece of curved metal called a rubbing iron between the flat donuts and on top of the wires so he can press down hard on the hot iron, rolling the ring and wires back and forth under the weight of the rubbing iron, thus straightening the wires. (And yes, that would have been easier to explain if I'd taken a photo, but the whole rubbing ring display was under a very glare-y bit of plexiglass and - shockingly - Google images returns nothing appropriate for the search term "Victorian needle making rubbing ring" so you'll just have to use your imagination, aided by my brilliant description.)

Pointing was a notably dangerous job (even by Victorian standards) therefore highly paid. Pointers sat at a spinning stone grinding wheel holding five or six wire blanks flat between their palms, rolling them back and forth while pressing them against the grinding wheel to create the sharpened needle point. This process naturally created a toxic cloud of stone dust and metal filings which the pointer breathed in constantly, causing a condition known as Pointer's Lung (a form of silicosis). Not only that, but the grinding wheel itself was known to break apart completely on occasion, which would have been at first surprising and then almost always lethal. Pointers rarely lived past 30. The display in the museum noted that hand-pointing is still used (with modern dust-extraction methods) for specialist surgical needles. Though judging by the sideburns on the gentleman in the accompanying photo I question whether that's still the case in the 21st century.
After pointing, the blanks needles must be skimmed (Step 5) to remove the scale created by heating and rubbing, leaving the middle of each wire clean for the next steps: stamping and eyeing (Steps 6 and 7). Stamping is accomplished with a kickstamper - a large press with a stationary bottom die and an upper die that drops on top of the blanks to create an impression where eyes of the needles will be. The Stamper raises and lowers the heavy upper die with a rope-and-pulley system operated by his right foot, and the best could process three blanks per second.

The stamped blanks are then passed on for eyeing. Usually done by women, eyes in each two-needle blank are punched with a fly press, which Astute Go Stay Work Play Live Readers will remember from our visit to the Coffin Works, also in Birmingham.
The next comes spitting, heading and cheeking (Step 8-9-10 for those keeping track), also usually done by women, often working at home. This sort of piecework was common and meant that women could remain at home and care for children (who might also be put to work) while also earning a wage. Stamping and eyeing leave sharp edges and flashing around the inside and outside of the eye which cut any thread thus rendering the needle largely non-functional. Spitting involved threading the two needle units onto metal spits which were placed in clamps to allow the flashing to be ground off by hand.

After grinding the outside, the needles are (finally) broken apart and the area at the break filed clean. Then batches of needles could be threaded onto wires and spun around, cleaning out the inside of each eye.
At this point, the needles go back to the mill. Because they're made of mild steel wire, they must to be laid out on heavy iron trays and put into a furnace to harden them and prevent them from bending (Step 11). Once the needles in each tray reach a temperature high enough to turn cherry red, the tray is carefully removed with heavy tongs and its contents quickly dumped into a barrel of oil to cool. (The best oil for hardening came from sperm whales. Obviously. Nowadays, nitrogen gas is used.) At first water was used for cooling, but this had a tendency to curve the needles, thus negating the hard work of the Rubber back in Step 3.

After the furnace the needles are hard but also incredibly brittle and fragile. This requires another trip into a cooler furnace for tempering (Step 12), and another oil bath.
And at this point, gentle GSWPL Reader, I sense you may almost be fed up with the minutiae of Victorian needlemaking, but the fun is not over yet. Oh no! There are five more steps before we end up with a lovely packet of sharp and shiny needles. It's time to move into the next building where the water-powered machinery runs the scouring mill (or doesn't run, even if the website says it does. Boo.) Scouring is how the needles acquire their fine, shiny surface, and involves packing 50,000 needles and soft soap into a tightly bound sausage wrapped in burlap and called a sett.

Creating these setts is Step 13, after which two packed setts are placed under a runner of the water-powered scouring mill where they are pressed and rolled back and forth (Step 14). This process could take a day for lower quality needles, or up to a week for the brightest and best quality needles.
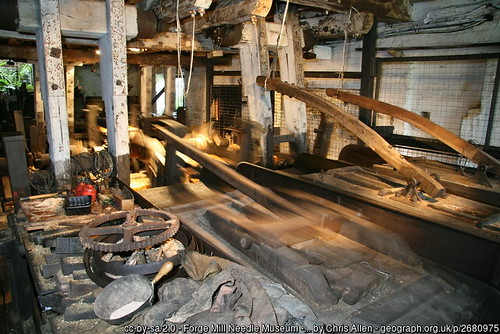
Chris also posted this excellent description, which I see no need to edit: "The waterwheel drives a crankshaft via gearing and this drives scouring runners on two floors. The runner closest is moving while the two on the right are disconnected with their drive rods roped up. The white vertical wooden beams oscillate back and forth and pass up to the floor above to drive a further 8 sets of runners - the white beams have the onomatopoeic name of whee-whaws." Whee-whaws! Fantastic! (Chris also noted that this machinery was in commercial use until 1956!)
Following days of scouring, the setts are re-packed with a mixture of olive oil and tin oxide and put back in the scouring mill for 2-3 hours to glaze the needles for a final time. After glazing (Step 15), the needles are removed from the setts and washed (Step 16), then placed in rotating barrels of hot sawdust to dry.

In order to separate the dry needles from the sawdust, the mix is placed in a fanning out tray, which, when skilfully tossed in the air, separated the heavy needles from the lighter sawdust. (Step 18... it's the home stretch now!)

Finally, finally, finally, the finished needles are individually poked through a small sheet of carefully folded, black, acid-free paper and set into little books to be sent out to distributors.

I think that's 19 steps overall, though each of those steps could probably be broken down further. Regardless, I think we can agree that the whole business was incredibly painstaking and also pretty clever. I think it's great that there was a time when we where smart enough to make big heavy machines to manufacture things, but still needed dozens of highly skilled people to operate those machines. Yeah, those people worked in pretty awful conditions, and some got horrible diseases, and they were paid meagrely, and worked long hours. But at least they had work.
Once I'd made sure I thoroughly understood the whole scope of needlemaking so that I could spend 2,000 words explaining it to you in unnecessary detail, I spent a bit of time poking in the upstairs displays. The mill wasn't confined to the manufacture of simple hand-sewing needles, they also made pins, knitting needles, surgical needles, fish hooks, hat pins, sewing machine needles, gramophone needles, bookbinding needles and gigantic mattress needles, used for stitching the two sides of a mattress together. There was even an example of what was claimed to be the longest needle in the world, at 6'1". These were made for attaching buttons longways through the sides of mattresses, and are definitely not something you want to encounter in a dark alleyway.
When I finally emerged into sunlight, I enjoyed a mandatory coffee and cake (carrot, though naturally Victoria Sponge was also available) and had another crack at the crossword puzzle. I also wandered around the 1940 Weekend displays of the Worcs 9th Batt. C Company Home Guard re-enactment group which was charming but fairly standard WWII fare. Lots of stuff about ration books, gas masks, and machine gun emplacements, with Glenn Miller on endless repeat in the background.

I also bought a few needles in the gift shop, including some useful looking curved ones, and a pair of wicked mattress needles about a foot long. Because how great is it going to be when some weirdo task crops up that requires a foot-long needle, and I've got not one but two standing by? Very great. Then it was back to the train station for a quick trip home, aglow with the satisfaction of having ticked all the appropriate bloggy boxes for the first time in far too long.