I mentioned last time that November was a busy month here at Go Stay Work Play Live World HQ on board the Lucky Nickel. As I said, I was working on some fairly extensive interior renovations on the boat, and am pleased to report that things are looking decidedly more ship-shape these days. Not wanting to miss a chance to show off the boat, and ever mindful of the small percentage of the vanishingly tiny number of regular GSWPL readers out there who are keenly interested in all things boaty (Steve G, are you still out there?), I thought I’d do a little Before & After, and tell you a little bit about what it’s like to live in 200 square feet (18 square metres) while renovating large chunks of it at the same time. (Spoiler alert: Difficult and annoying!)
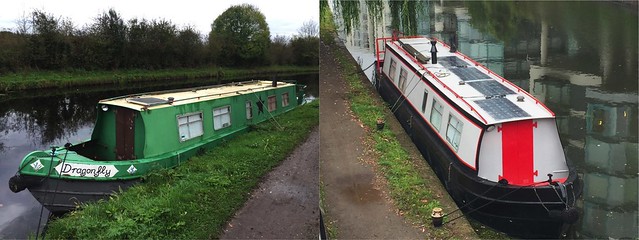
Back when I bought it, the boat was not exactly the slickest looking thing on the canal. Astute Go Stay Work Play Live readers will remember the outside was a nasty shade of worn out green. And they’ll also remember the exciting moment when I got home from the first Azerbaijan gig to the freshly painted boat and later when I had the sign writing done. That was the first step.
Then I went on to tackle some of the more egregious interior fittings, eventually getting to a point where things were in all cases functional and in some cases even sort of normal-looking.
All of these were relatively simple upgrades. Paint does wonders, and replacing the Unabomber style rough-edged wooden shelving in the kitchen with clean white timber was easy and had a lot of impact. But there were still a few things that I knew were going to be a much much bigger job.
And the floor. Ah... the floor. It was a mottled mish-mash of very worn cork tile glued over wood-effect vinyl glued over the plywood subfloor. Mostly. Some areas had no cork. Some had no vinyl either. And there were a number of worryingly squishy soft spots that I’d simply covered with patches of plywood reasoning that I’d fix when I dealt with the floor in general. Because no number of trips to IKEA or coats of paint were going to make that floor anything that I wanted to continue to live with.
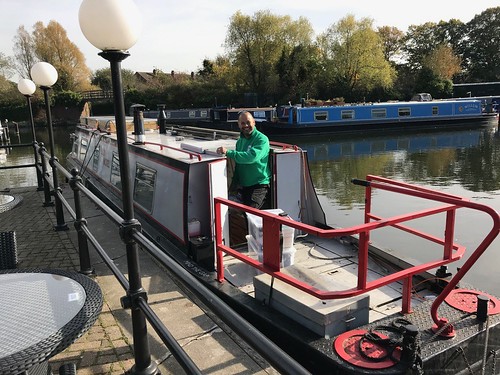
As I said, I've been planning this for a while. I estimated things would take about a month and resolved to simply settle in at my far-flung mooring for the duration. There are some significant advantages to the mooring. First, I can plug into mains power, which is critical even if you only consider the amount of vacuuming I had to do. Second, there’s a B&Q just down the road (for Canadian readers, substitute Home Depot for B&Q). There’s also a large Tesco nearby so I could easily keep myself fed. (I had lunch most days in the Tesco Café where they do a pretty credible tuna mayonnaise jacket potato and nice raspberry brownies). The marina is also an easy place to receive deliveries. In fact, I got quite adept at driving the boat backwards from my berth to the slipway near the carpark making it relatively simple to get large amounts of stuff on and off the boat.
The marina also has one significant disadvantage: it is so poorly located for transport that I have to allocate about 90 minutes to get anywhere more exciting than Acton. Even though I’ve moored at places that are geographically much further from central London, the particular corner of the world where my marina is happens to fall inconveniently far from any tube or rail station and is served by a single circuitous bus route that seems to spend most of its time stuck in traffic. The cursed Route E6 doesn’t even have the self-respect to use double-decker buses, which is a dead giveaway that you're not exactly at Piccadilly Circus. I reasoned that the difficulty of escaping the area would simply concentrate my efforts to finish up and be free.
So it began. With extraneous materials removed, I dismantled the old bed frame and the bedroom officially became the workshop. And what does any self-respecting workshop need? A good power saw of course!
First on the list was re-building the front step to turn it into a much larger, more stable and more accessible storage area, and next was a new bed frame that hinges up for easier access to the storage underneath. Then it was on to the floor! I decided to use the same engineered laminate flooring through the whole boat, though not the posh kind that’s got a layer of real wood on the top. Mine has a very attractive picture of wood on it, and some fake embossed texture to add to the illusion. It’s nicer than it sounds, really. What was NOT nice was getting 150kg of laminate flooring from B&Q onto the boat.
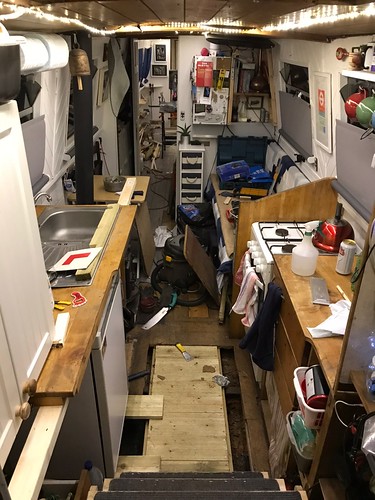
The flooring install was ok. Mostly it was all just… tricky. It’s such a tiny space to work in that I was constantly stepping over things and having to shift stuff around just to be able to make progress. I think I probably spent about half the time working and half the time getting ready to work or shifting things around to prepare a next step or vacuuming and tidying up at the end of each day. The end of day clean-up was the most dispiriting. By the time I was ready to call it a day, sometimes it looked like this:
It took me about an hour every night to get all the tools stowed, exile the debris to ever-growing piles on the pier outside the boat, and vacuum and vacuum and vacuum some more. Then I could open up the bathroom and rebuild the bed and then, finally, think about making some supper. I did get into a bit of a rhythm but really, it’s not an ideal way of working. It was, however, very very cheap. No added living costs and no commute time to get from bed to workshop!
I feel like I’m getting things out of order here, but that’s kind of how it happened. I started the floor and got it laid through the bedroom, bathroom and hallway before I had to start dismantling kitchen cabinets in order to get the new flooring into that area. Plus, because both the stove and the fridge have flexible gas connections, I was keen not to have to disconnect them because that would mean getting a certified gas engineer in to re-connect them. Instead I carefully shifted them from side to side, accessing tiny areas of floor then shifting again for the next tiny area. There were times when the only way to get from the work area to the rest of the boat was to climb over the stove.
And then it all went a bit wrong. Astute Go Stay Work Play Live readers may recall me mentioning worryingly squishy bits of floor in the kitchen, which I cleverly ignored for a few years by laying some plywood and pretending it was all fine. Now though, it was time to see what was really happening under there. And it was not pretty. Oh no. Not at all.
I sought advice from the guys at the marina, who found my distress a bit amusing. “It’s a steel boat, of course there’s rust”. One of them came over to have a look and made my heart stop by poking at the bottom plate with a screwdriver. I had visions of it going straight though whatever was left of the steel, creating a geyser of canal water in the middle of the boat. But it didn’t, and he declared that what was left was strong. Based on what? I don’t know. Probably based on him not wanting to make me cry. (And yes, there's definitely an argument to be made that it was maybe not smart to do a whole lot of interior work on the boat if the actual integrity of the hull is suspect. Too bad. I've never claimed to make particularly practical decisions when it comes to the boat. Why start now?)
So I got stuck in. Scraping out all the loose stuff with a putty knife (there was lots and lots) and then vacuuming and scraping more and then brushing it all with a rust inhibitor which had to dry for two days. Then painting to protect the steel that’s left. And then the whole subfloor had to be replaced. The area pictured above is less than a third of the area that needed this treatment. Bearing in mind the whole thing preceded like this: shift the fridge/stove two feet, cut out old flooring, scrape out rust, vacuum, treat for rust, allow to dry, cover with new subfloor, shift fridge/stove onto new subfloor, repeat for area recently covered by fridge/stove, etc…Then repeat for the painting, then add 50mm thick styrofoam insulation panels and then permanently fix down the new floor, then, and only then, actually finish laying the new laminate flooring.
And then, at last, it was time for the final step… the kitchen! I’d already been to IKEA to order my new cabinets, which arrived in 37 boxes (Not kidding. Literally 37 boxes). Here too, it wasn’t as simple as just assembling and shoving them into place. Of course not! There’s nothing simple on a boat. Instead, I took each of the 60cm deep cabinets and carefully trimmed 50mm off the back of each piece with my magic saw before assembling them, thus gaining a small but very significant bit of extra space down the centre of the kitchen. And then I added temporary countertops because I haven’t really decided what I’m doing about countertops yet. And I reinstalled the old sink because until there are new counters there no point in a new sink. And there are still other bits to add and fix and it’s not all perfect but…
Of course there's more to do. The kitchen countertops. A few more drawers. One narrow cabinet. A new system for the recycling. And the sink in the bathroom. And the floorboards all need to be secured better. And the fireplace surround needs serious attention and and and and… But I decided after a long month of hard work and dust and Tesco jacket potatoes I deserved to enjoy my new space and relax a bit before the Christmas Holidays. So cleaned everything up, and organised things in my lovely new cabinets and called some men to haul away the mounds of rusty rubbish and aimed my boat back at central London where I’m now whiling away a couple of weeks with Christmas shopping and stoking the fire and having people over to ooh and aah over my lovely new home.
And, most importantly, not vacuuming for two hours a day.
Back when I bought it, the boat was not exactly the slickest looking thing on the canal. Astute Go Stay Work Play Live readers will remember the outside was a nasty shade of worn out green. And they’ll also remember the exciting moment when I got home from the first Azerbaijan gig to the freshly painted boat and later when I had the sign writing done. That was the first step.
Boat exterior - Before and After
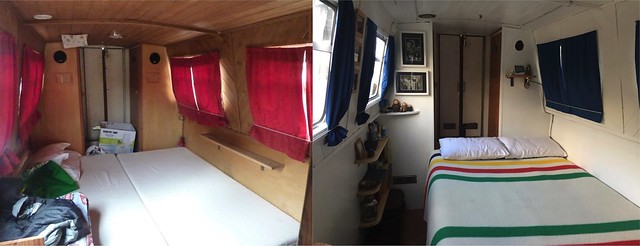
Like here in the bedroom
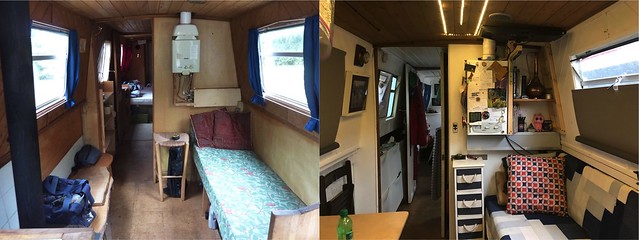
And here's what the living area looked like on the day I bought the boat, and what it looked like a few coats of paint and several years later.
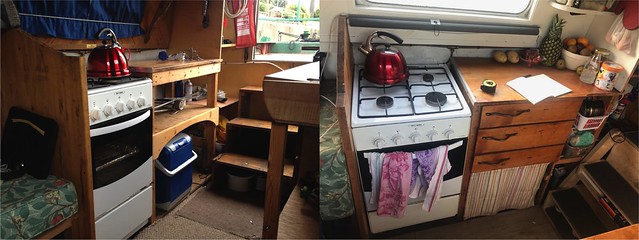
The kitchen area is better than it was, but still, those open shelves and rough drawers were just not up to scratch.
As I said, I've been planning this for a while. I estimated things would take about a month and resolved to simply settle in at my far-flung mooring for the duration. There are some significant advantages to the mooring. First, I can plug into mains power, which is critical even if you only consider the amount of vacuuming I had to do. Second, there’s a B&Q just down the road (for Canadian readers, substitute Home Depot for B&Q). There’s also a large Tesco nearby so I could easily keep myself fed. (I had lunch most days in the Tesco Café where they do a pretty credible tuna mayonnaise jacket potato and nice raspberry brownies). The marina is also an easy place to receive deliveries. In fact, I got quite adept at driving the boat backwards from my berth to the slipway near the carpark making it relatively simple to get large amounts of stuff on and off the boat.
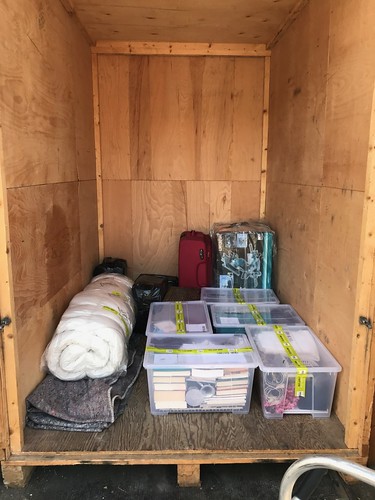
Like this! Here’s the lovely men from the stage company loading up the ridiculously small amount of worldly goods I sent away to give myself a bit of working space.
I probably could have managed with a slightly smaller storage pod.
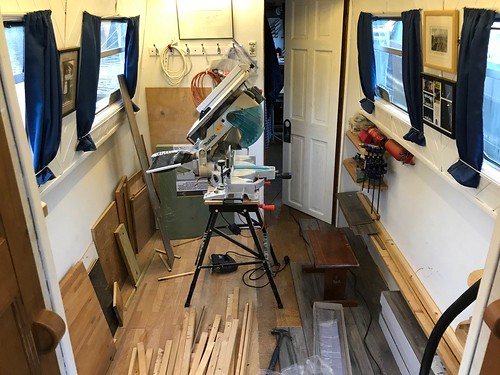
So it began. With extraneous materials removed, I dismantled the old bed frame and the bedroom officially became the workshop. And what does any self-respecting workshop need? A good power saw of course!
The workshop. Check out that saw! It’s a chop saw that is also a table saw! Bloody brilliant. I’m very very very happy with this device. I even built the new bed frame so that the saw fits exactly underneath it. I love this saw. But it did make a LOT of sawdust, hence all the vacuuming.
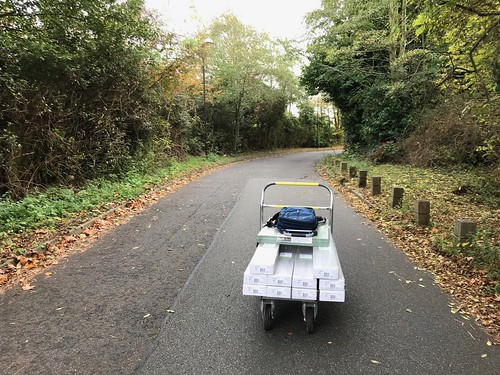
This photo was taken part way down the long road between B&Q and the marina, with me hauling that cart every inch of the way. Then I carried each of those surprisingly heavy packs to the very very end of the pier to my berth and then stacking them in the boat. And then I trudged the empty cart back to B&Q. Tough day. I repeated this process for other materials too. It was kind of not fun.
Holes in the floor, tools and debris everywhere, vacuum constantly in a place to be tripped over, and temporary structure holding stuff up. And odd bits of normal life interspersed, like the aloe plant in the middle of the chaos and a suspicious tin of lager on the counter...
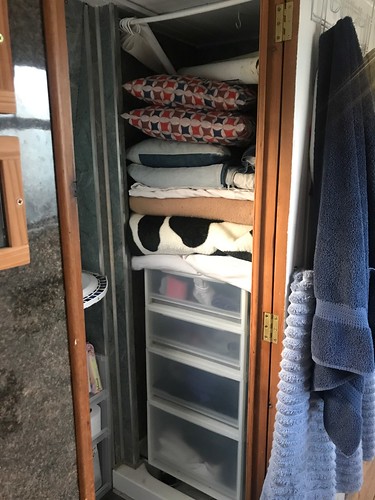
There was only one room in the boat that was relatively free from building detritus - the bathroom. Every morning I had to dismantle the temporary bed (three couch cushions, three blankets, two pillows and a spare sleeping bag for extra insulation), and stack all the bedding on top of the bedroom drawers that lived for a month in the shower stall.
Couch cushions went in front of this and then shelves and folding chair and whatever else was in the way.
I feel like I’m getting things out of order here, but that’s kind of how it happened. I started the floor and got it laid through the bedroom, bathroom and hallway before I had to start dismantling kitchen cabinets in order to get the new flooring into that area. Plus, because both the stove and the fridge have flexible gas connections, I was keen not to have to disconnect them because that would mean getting a certified gas engineer in to re-connect them. Instead I carefully shifted them from side to side, accessing tiny areas of floor then shifting again for the next tiny area. There were times when the only way to get from the work area to the rest of the boat was to climb over the stove.
And then it all went a bit wrong. Astute Go Stay Work Play Live readers may recall me mentioning worryingly squishy bits of floor in the kitchen, which I cleverly ignored for a few years by laying some plywood and pretending it was all fine. Now though, it was time to see what was really happening under there. And it was not pretty. Oh no. Not at all.
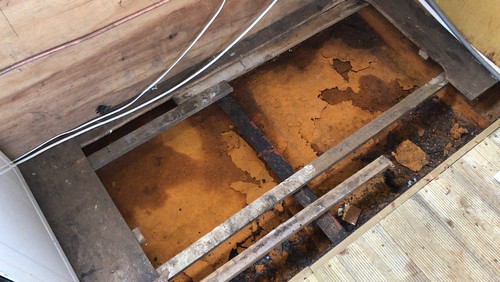
This is what was underneath. Rust so thick it made me feel a bit sick.
So I got stuck in. Scraping out all the loose stuff with a putty knife (there was lots and lots) and then vacuuming and scraping more and then brushing it all with a rust inhibitor which had to dry for two days. Then painting to protect the steel that’s left. And then the whole subfloor had to be replaced. The area pictured above is less than a third of the area that needed this treatment. Bearing in mind the whole thing preceded like this: shift the fridge/stove two feet, cut out old flooring, scrape out rust, vacuum, treat for rust, allow to dry, cover with new subfloor, shift fridge/stove onto new subfloor, repeat for area recently covered by fridge/stove, etc…Then repeat for the painting, then add 50mm thick styrofoam insulation panels and then permanently fix down the new floor, then, and only then, actually finish laying the new laminate flooring.
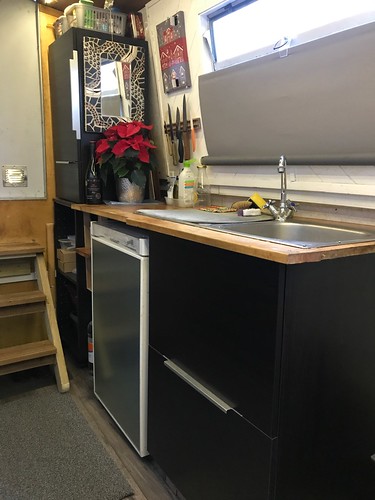
And then, at last, it was time for the final step… the kitchen! I’d already been to IKEA to order my new cabinets, which arrived in 37 boxes (Not kidding. Literally 37 boxes). Here too, it wasn’t as simple as just assembling and shoving them into place. Of course not! There’s nothing simple on a boat. Instead, I took each of the 60cm deep cabinets and carefully trimmed 50mm off the back of each piece with my magic saw before assembling them, thus gaining a small but very significant bit of extra space down the centre of the kitchen. And then I added temporary countertops because I haven’t really decided what I’m doing about countertops yet. And I reinstalled the old sink because until there are new counters there no point in a new sink. And there are still other bits to add and fix and it’s not all perfect but…
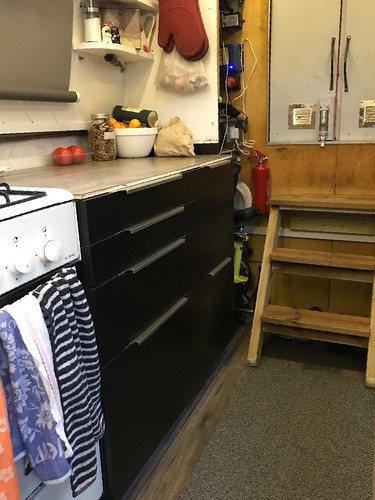
Look! Real drawers!
And this! All my grubby coal and kindling is neatly corralled in a drawer under the sink. And the front panel of the fridge turns out to be a much more interesting colour on its back side. And I’ve got a proper upper cabinet, and more counter space, and room for a handmade-long-packed-away mirror and a poinsettia and an Advent calendar!
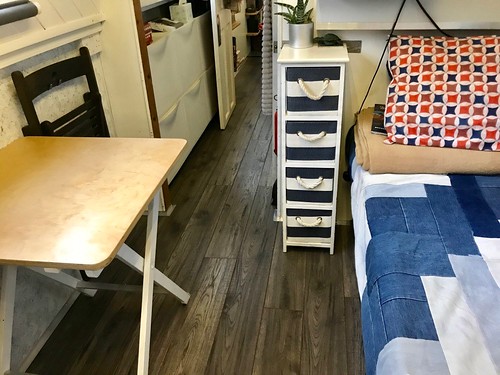
And the floor. Oh the floor. What a difference.
And, most importantly, not vacuuming for two hours a day.



6 Comments:
Nice! Love a good boat post...
Wow - impressive project, and more impressive progress.
Great work! What a difference!
Well done, Pam! It looks sleek and fresh and efficient. Impressive! Enjoy!
Sorry I fell a little behind on my reading.
Bloody brilliant boat post!
(My attempt at speaking British)
Keep well,
Steven G.
AHHH-mazing!
Post a Comment